


By INKBANK Group · Published October 2026 · UV adhesion technical guide
The short answer: UV ink adhesion on acrylic, metal and glass is not controlled by the substrate name alone. It depends on three variables working together: the actual surface condition, the primer or adhesion promoter, and the UV cure window. Clean and prepare the surface first, select a primer that matches both the ink and the substrate, and verify the UV dose at production speed. Then test the finished part, not just a flat sample.
UV printing is often described as a rigid-substrate process. In production, rigid covers a wide range of materials: cast and extruded acrylic, anodized aluminium, stainless steel, galvanized steel, powder-coated metal, soda-lime glass, borosilicate glass and many coated or laminated panels. Each one can fail for a different reason.
The ink may be blamed first, but adhesion failures often start before the printhead fires. Oil, release agent, dust, moisture, laser-cut residue, an unstable oxide layer or an incompatible primer can all weaken the bond. The cure window can also be wrong for the substrate: enough energy for a metal panel may overheat a thin acrylic sheet, while a glass part may look cured but fail after water immersion.
Why Rigid Substrates Fail Differently From Flexible Films
Flexible films fail when the ink cannot move with the film. Rigid substrates fail for a different set of reasons.
Rigid parts do not stretch, but they can still create stress at the ink-substrate interface. Thermal expansion differs between the ink, the primer and the substrate. A metal panel may expand more than the coating. A glass edge may concentrate stress. An acrylic sheet may craze or deform if it sees too much heat or an aggressive solvent. A powder-coated metal surface may have a different surface chemistry from the bare metal underneath.
Common rigid-substrate failure patterns include:
Ink lifts at the edge after cutting, drilling or handling.
The print looks cured but flakes after a scratch or impact.
Adhesion is acceptable before water immersion or humidity exposure, then falls sharply.
The primer improves initial adhesion but discolours, blisters or softens later.
The ink bonds to the primer, but the primer does not bond to the substrate.
A clear or white layer fails before the colour layers.
Thin metal or acrylic panels warp during curing, creating stress at the print edge.
The failure plane matters. If the ink separates cleanly from the primer, the ink-primer interface is weak. If the primer separates from the substrate, the surface preparation or primer choice is the problem. If the coating splits inside itself, the cure level or ink film properties need attention.
Acrylic: Low Surface Energy, Static and Solvent Sensitivity
Acrylic, or PMMA, is a popular rigid substrate for signage, display parts, point-of-sale pieces and industrial covers. It can also be one of the more difficult surfaces for UV ink adhesion.
Acrylic typically has a relatively low surface energy compared with glass or bare metal. That makes wetting more difficult. The surface also attracts dust through static charge, and protective masking can leave adhesive residue. Laser-cut acrylic can carry residue along the cut edge, while flame-polished or solvent-polished surfaces may behave differently from the original sheet.
Acrylic is also sensitive to some solvents and to excessive heat. A cleaner or primer that works well on metal may attack the acrylic surface, cause crazing or leave a haze. A cure setting that is safe for a metal panel may be too hot for a thin acrylic sheet.
What to check before printing acrylic
Confirm whether the sheet is cast or extruded, and whether it has a protective mask, coating or flame-polished edge.
Remove dust and masking residue with a cleaner recommended for the specific acrylic grade. Test on an inconspicuous area first.
If the process allows it, use a controlled surface preparation method such as mild abrasion, plasma or flame treatment. Do not assume that abrasion is harmless: it can change gloss and clarity.
Use a primer or adhesion promoter only when it is compatible with both the acrylic and the ink. The primer must not craze, cloud or soften the sheet.
Control the cure window. Watch panel temperature, lamp distance, line speed and the number of passes. More UV energy is not automatically better for a heat-sensitive substrate.
Metal: Contamination, Oxide Layers and Thermal Expansion
Bare metal can have high surface energy, but the surface that reaches the printer is rarely bare. Aluminium may carry rolling oil, oxide, anodized layers or a conversion coating. Stainless steel may have a passive oxide film and cutting fluid residue. Galvanized steel has a zinc surface that can react with some chemistries. Powder-coated metal has a polymer surface that behaves differently from the metal below.
That is why a metal panel can pass a quick tape test on one batch and fail on the next. The substrate name did not change, but the surface condition did.
What to check before printing metal
Identify the exact metal and surface condition: bare, anodized, brushed, polished, galvanized, powder-coated or laminated.
Remove oils, cutting fluid, fingerprints and dust with a process appropriate for the metal and the ink system.
If the process allows it, use a controlled mechanical preparation or plasma treatment to create a consistent surface. Avoid contaminating the prepared surface before printing.
Select a primer or adhesion promoter that is compatible with the metal, the surface treatment and the ink chemistry. Anodized aluminium and stainless steel may need different primer directions.
Check heat transfer and thermal expansion. Thin metal panels can heat quickly and distort. A curing profile that works on a thick plate may not work on a thin sheet.
For anodized aluminium, the surface can be porous and may contain sealed or unsealed areas. A primer that works on bare aluminium may not behave the same way on an anodized surface. The only reliable answer is a controlled trial on the actual anodized part.
Glass: High Surface Energy, Moisture and Edge Stress
Glass usually has high surface energy, which sounds ideal for adhesion. In practice, glass can still fail because of contamination, moisture, edge stress and thermal shock.
Glass is often cleaned with a residue-free process, but fingerprints, polishing compounds, protective films and airborne dust can quickly reduce the effective surface quality. Moisture can also interfere with the primer or the ink interface, especially in humid production environments.
Silane-based adhesion promoters are commonly used to improve the bond between organic coatings and glass, but they must be matched to the ink and applied correctly. Primer coverage, drying, humidity and flash-off time all matter. A primer that is applied too thickly, dried unevenly or contaminated before printing can create a new failure plane.
What to check before printing glass
Confirm the glass type, edge condition and any coating or surface treatment.
Clean the surface with a process that removes oils and residues without leaving a film.
Control humidity and the time between cleaning, priming and printing.
Use a primer or adhesion promoter compatible with the glass and the ink. Verify the required coverage, drying time and pot life.
Avoid thermal shock during curing. Watch the temperature difference between the glass and the surrounding process, and test the finished part after water immersion and humidity exposure.
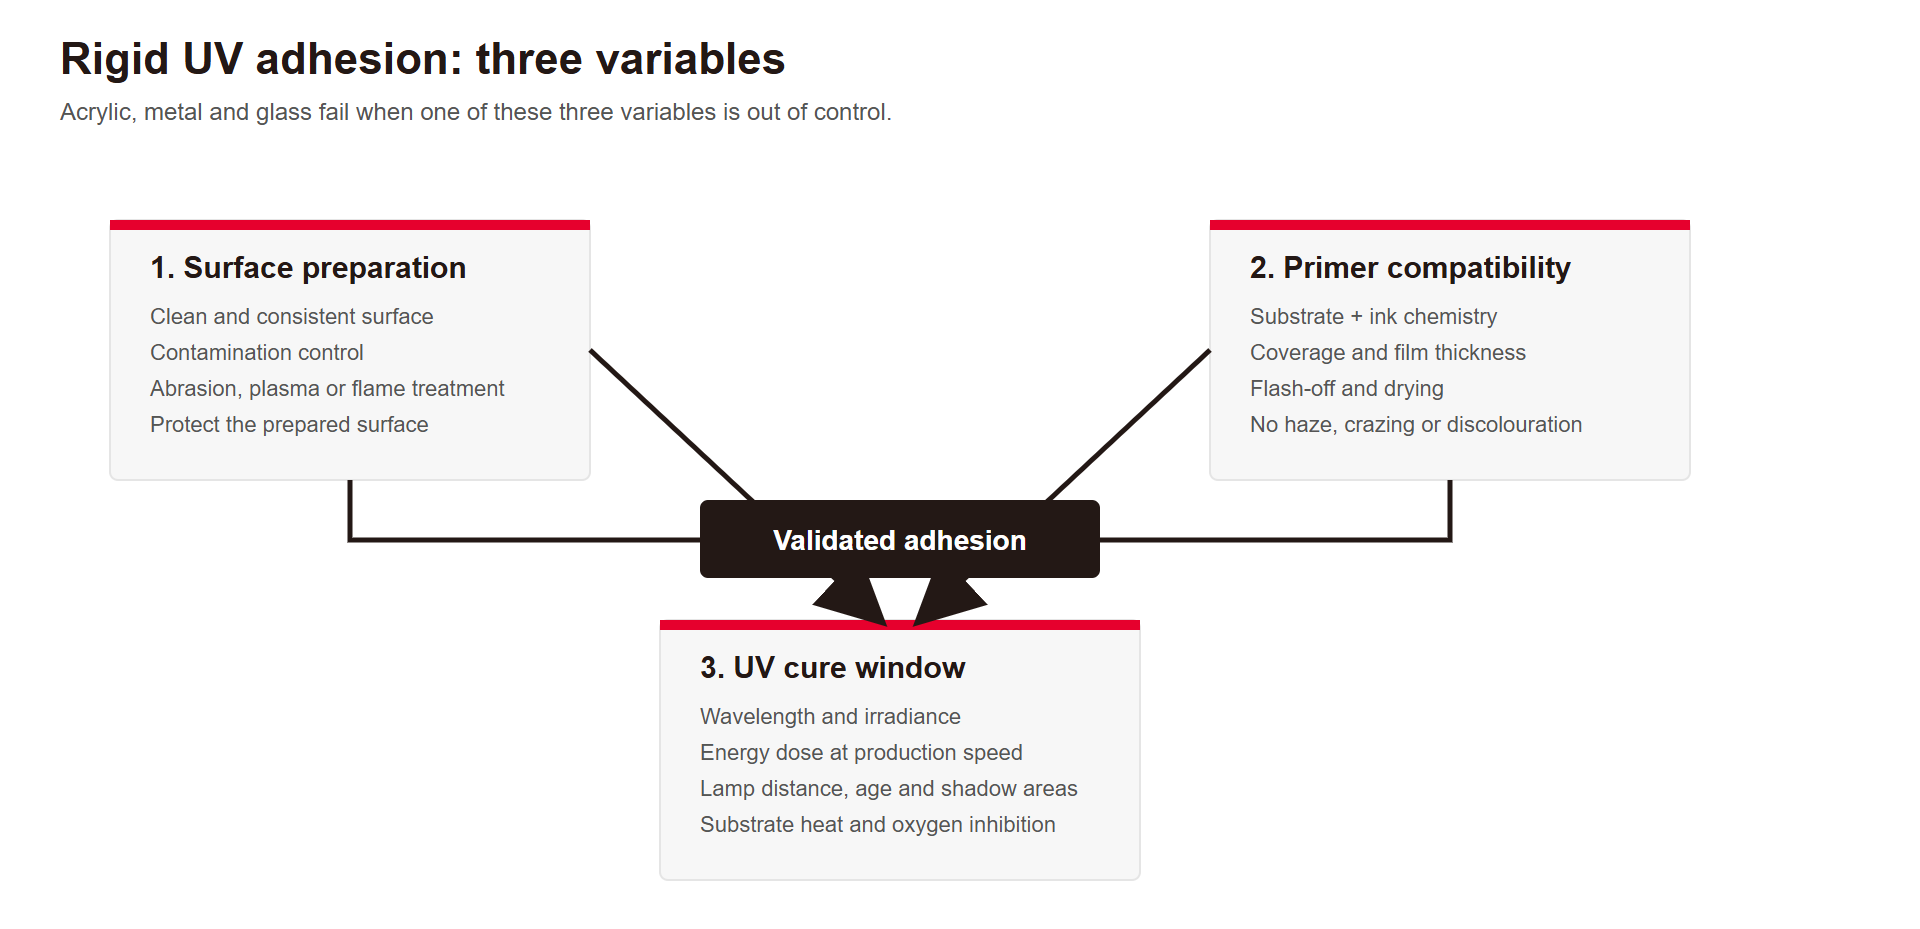
The Three-Variable Adhesion Triangle
Surface preparation, primer selection and the UV cure window must be treated as one system. Improving only one variable can move the failure to another interface.
Substrate Preparation Matrix
| Substrate | Why adhesion is difficult | Preparation direction | Primer decision | Cure watch-outs |
|---|---|---|---|---|
| Acrylic / PMMA | Low surface energy, static dust, masking residue, solvent and heat sensitivity | Clean with a compatible process; consider mild abrasion, plasma or flame treatment if the process allows | Often needed, but the primer must not craze or cloud the acrylic | Panel temperature, over-cure, edge stress, solvent attack |
| Bare aluminium | Rolling oil, oxide, cutting fluid, inconsistent mill finish | Degrease; controlled mechanical or plasma preparation; protect the prepared surface | Chemistry depends on the alloy and surface condition | Heat conduction, thin-panel distortion, thermal expansion |
| Anodized aluminium | Porous or sealed surface, contamination, variable anodizing quality | Identify the anodizing type; clean and prepare according to the coater and ink supplier | A primer direction for bare aluminium may not transfer directly | Surface porosity, heat, edge sealing and post-treatment |
| Stainless steel | Passive oxide film, cutting fluid, fingerprints, brushed or polished finish | Degrease; controlled abrasion or plasma treatment where suitable | Primer or adhesion promoter often required; confirm compatibility | Heat, thermal expansion, corrosion exposure, salt spray |
| Galvanized steel | Zinc surface can react with some chemistries; oil and conversion coating | Identify the coating; clean and prepare consistently | Confirm primer compatibility with zinc and the ink | Heat, coating adhesion, corrosion and edge exposure |
| Powder-coated metal | Polymer surface differs from bare metal; cure level and contamination matter | Clean; lightly prepare only if the coating allows it; avoid breaking the coating | Primer may be needed, but compatibility with the powder coat must be verified | Overheating, coating softening, intercoat adhesion |
| Soda-lime glass | Contamination, moisture, edge stress, thermal shock | Clean, control humidity, consider plasma or flame treatment where appropriate | Silane-based promoters are common; confirm with the ink supplier | Thermal shock, water immersion, humidity, edge stress |
| Borosilicate glass | Similar to soda-lime but different thermal and surface behaviour | Clean and prepare according to the glass grade | Confirm primer and ink compatibility | Thermal cycling, edge condition, post-cure |
Surface Preparation: The Sequence That Works
Identify the substrate and its coating. Record the supplier, grade, surface finish, coating, anodizing, powder coat and edge condition.
Remove gross contamination. Remove oils, cutting fluid, dust, masking residue and handling marks with a process that does not leave its own residue.
Prepare the surface consistently. Depending on the material and application, this may be controlled abrasion, plasma, flame treatment or a chemical preparation. The same method may not suit acrylic, metal and glass.
Apply the primer correctly. Confirm coverage, wet film thickness, flash-off time, drying condition and pot life. A primer that is too thick, too thin or uneven can become the weak link.
Protect the prepared surface. Handle parts with clean gloves and control the time between preparation, printing and curing.
Print and cure within the validated window. Record the UV wavelength, measured irradiance and dose, line speed, lamp distance and panel temperature.
Test the finished part. Do not approve the process on a flat coupon alone. Test edges, holes, bends, cut lines and the real end-use environment.
Primer Selection and Application
A primer is not a substitute for cleaning. It is an additional interface that must be compatible with the substrate, the ink and the production process.
Ask these questions before choosing a primer:
Is the primer designed for acrylic, metal or glass, and for the specific coating on the part?
Is it compatible with the ink chemistry and the UV cure system?
Does it require a specific surface preparation before application?
What coverage, wet film thickness and flash-off time are recommended?
Does it need heat, air movement or a specific humidity range to dry?
How long can the primed part wait before printing?
Does the primer affect gloss, clarity, colour or surface texture?
Does it remain stable after water immersion, humidity, heat or outdoor exposure?
The cheapest primer is not the lowest-risk primer. A primer that costs less but causes rework, edge lifting or a visible haze can be far more expensive in production.
The UV Cure Window: What to Measure
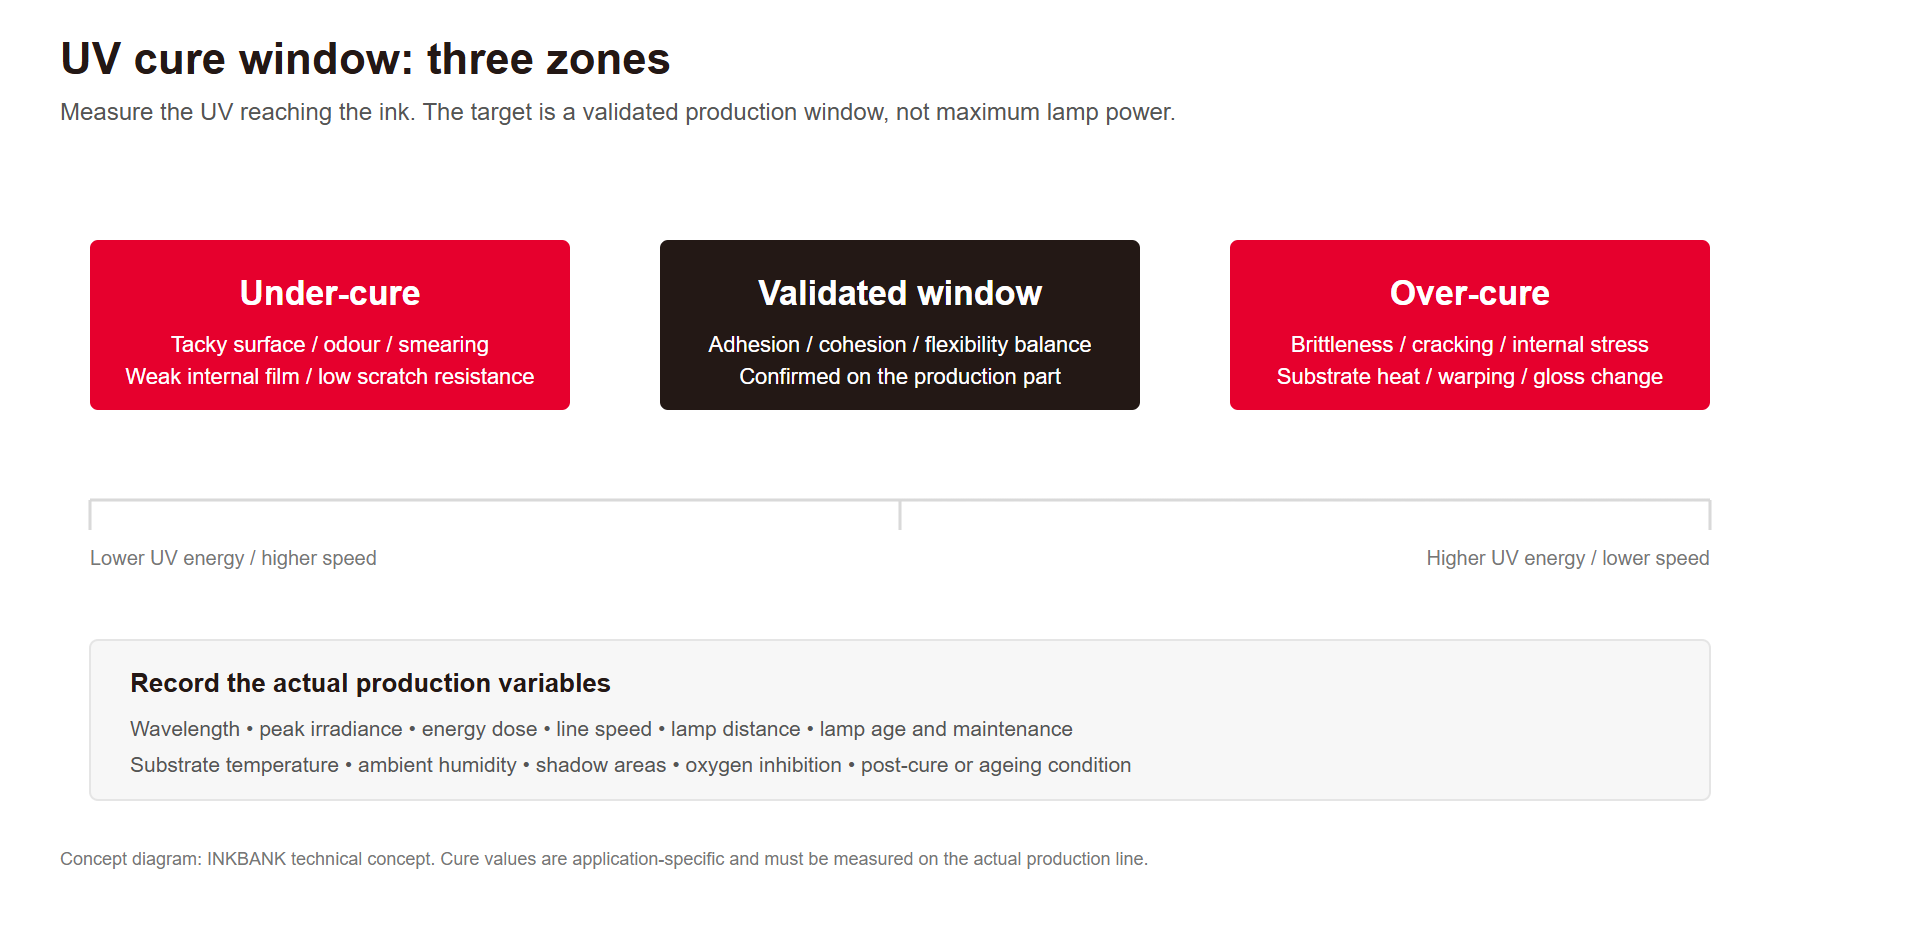
UV-LED curing is not controlled by a single lamp power setting. The ink must receive the right wavelength, irradiance and energy dose at the production plane, at the actual line speed, in the actual print geometry.
Record and control:
Lamp wavelength and emitter type.
Peak irradiance and total energy dose.
Line speed and number of passes.
Lamp distance, angle, reflector and window condition.
Lamp age and maintenance history.
Ambient temperature and humidity.
Substrate temperature before and after curing.
Shadow areas, edges and raised features.
Oxygen inhibition at the ink surface.
Under-cure can leave the ink soft, smelly, easily scratched or weakly bonded. Over-cure can increase crosslink density, internal stress and brittleness, and can overheat the substrate. The target is a controlled window, not the maximum available power.
How to Test Adhesion on Acrylic, Metal and Glass
Use a test that matches the failure mode and the real end use. A single tape test is not enough for an industrial part.
| Test direction | What it helps reveal | When to use it |
|---|---|---|
| Cross-cut or cross-hatch tape test | Interface adhesion and coating cohesion | Rigid flat areas where the coating can be cut consistently |
| Pull-off adhesion test | Adhesive strength of the coating system | When a quantitative result is required and the fixture can be bonded to the surface |
| Scratch, coin or fingernail test | Surface hardness and scratch resistance | Quick production checks and comparative trials |
| Solvent rub test | Cure level and chemical resistance | When the end use involves cleaning or chemical exposure |
| Water immersion or humidity test | Moisture sensitivity and delayed adhesion loss | Glass, metal, outdoor and humid applications |
| Heat, cold and thermal cycling | Thermal expansion and stress effects | Metal and glass parts, outdoor products, industrial equipment |
| Salt spray or corrosion exposure | Coating protection on metal | Metal parts exposed to moisture, salt or outdoor conditions |
| Impact and edge test | Resistance to handling, cutting and assembly damage | Signage, industrial panels and assembled products |
| Real-part test | The actual geometry, edge, coating and assembly | Always before production release |
Keep a control sample printed with a known-good ink, primer and cure condition. Without a control, a tape result or scratch result is difficult to interpret.
Common Field Questions
Why does UV ink stick to metal but peel from acrylic?
Acrylic usually has lower surface energy than bare metal, and it can attract dust or retain masking residue. It is also sensitive to some solvents and to heat. The same ink and primer combination may need a different preparation method and cure window on acrylic.
Do I always need a primer for UV printing on glass?
Not always, but glass applications often benefit from a primer or adhesion promoter, especially when the part will be washed, exposed to humidity or handled. The correct choice depends on the ink, the glass surface and the end use. Test the finished part.
Can I use the same primer on acrylic, metal and glass?
Not usually. The primer chemistry and the required surface preparation differ by substrate. A primer that works on metal may craze acrylic or leave a visible haze on glass. Confirm compatibility with the ink and substrate supplier.
Why does the print pass a tape test but fail after water immersion?
Water can penetrate the interface, soften the primer or reveal incomplete cure and contamination. Test the finished part after water immersion or humidity exposure if the product will see those conditions. A tape test immediately after curing is not enough.
How do I know if the UV ink is under-cured or over-cured?
Under-cure often shows as tackiness, odour, smearing, low scratch resistance or internal film failure. Over-cure can show as brittleness, cracking, edge stress or substrate distortion. Measure the UV reaching the ink and compare the result with the ink supplier's recommended window.
Does more UV power always improve adhesion?
No. More UV energy can improve cure up to a point, but it can also increase internal stress, brittleness and substrate temperature. The correct target is a validated window at production speed, not the highest available lamp setting.
How should I clean acrylic before UV printing?
Use a cleaner that is compatible with the specific acrylic grade and test it on an inconspicuous area first. Avoid aggressive solvents that can cause crazing or clouding. Remove dust and masking residue without leaving a new film on the surface.
How should I prepare anodized aluminium?
Identify whether the surface is sealed or unsealed, clean it consistently, and confirm the primer direction with the ink and anodizing supplier. Do not assume that a process validated on bare aluminium will transfer directly to an anodized surface.
What should I send for a UV adhesion evaluation?
Send the exact substrate and grade, surface finish or coating, primer information, printer and UV-LED setup, line speed, ink laydown, failure photos and the end-use conditions. A trial on the actual part is the only reliable way to approve the process.
Request a UV Adhesion Review
INKBANK supplies UV-LED curable inks for industrial digital printing applications and supports customers with application evaluation, sample testing and technical communication.
Send your substrate, primer, UV-LED setup and failure photos to our application team. We will help define a structured trial and recommend the appropriate ink direction for your substrate and end-use condition.
Related Resources
About INKBANK Group
INKBANK Group is a digital inkjet ink manufacturer with more than 20 years of experience in ink research and production. The company operates seven product lines covering textile, packaging and label, advertising and image, building decoration, electronic circuits, office desktop and specialty applications. INKBANK products are shipped to 100+ countries and regions. The company holds ISO 9001 and ISO 14001 certifications, and its UV ink portfolio includes GREENGUARD GOLD certification, while applicable products are REACH and RoHS compliant. Confirm the certificate scope and current product specification for your market and application.
Technical note: Primer choice, surface preparation, fixation and UV cure windows are application-specific. Validate the complete ink, primer, substrate and curing system on the actual production part before releasing a specification. This article describes an evaluation framework and does not replace a supplier trial or a customer-specific test plan.


